Friday, December 3, 2010

DIY car repair - Clean your car battery

Your car's battery is the starting point for every system it uses. So you should never let anything come between your car and a good battery connection.

In fact, you can notice that there are certain signs or symptoms when your vehicle battery is becoming weak:
1.Head lights become dimmer or less bright.
2.The horn becomes less audible.
3.Ignition becomes more difficult and the engine takes a longer time to start.
4.There will also be some problems with your automatic door systems.

Most common problems with car battery is corrosion. Car battery is powered by lead-acid battery, so it is best for nasty corrosion to happened, which will appear as white, crusty residue around the battery posts.


However, you can clean it by yourself, but you need to be extremely careful about this.

The first step is to remove your battery terminals. You can use open end wrenches or something more universal like or a small Crescent wrench.  
You should always remove the negative cable first (black colour). Place one wrench on the outside nut and (if needed) the other wrench on the other side.
You can use a piece of tape to hold this lead away from the battery while working on the positive side, so that it doesn't touch the negative terminal again.


There are a number of ways to get the corrosion off your battery posts.The most easiest way is to mix the baking soda powder with some water to neutralize the acid that accumulate at battery terminals.

Squirt the solution on the battery posts and terminals, then brush it to remove the stain.


If you have a serious case of corrosion like the one in pictures above, you may want to remove the battery, and clean it up to prevent all that corrosion from getting around in the engine compartment.

You'll need a wire brush and a little elbow grease to liberally brush all of the parts, especially the inside of the terminals, until the corrosion is gone


Once they're clean, install anti-corrosion discs if you're using them. Remember to install the red disc on the positive post and the green on the negative.

Last step is to reconnect the battery. First attach the positive terminal clamp, and then attach the negative. Then, you are set to go.

Thursday, December 2, 2010

DIY car repair - Replace Air Filter

Car engine is like a giant pump, it suck in air, mixes the air with fuel and ignites this mixture in order to produce the power to move your car. 


Over time the air filter can become clogged with dirt, grime, bugs and debris, it will greatly affected the efficiency of your car engine. Besides that, the faulty air filter may causes dirts to enter engine block, causing damage to car engine in long term.

it is important that you check the filter and change it once a year or every 25000km, .If you live in an averagely dusty area, it is recommended to perform regular checking once in a while and replace it as soon as it needs would be much better.


How to replace air filter


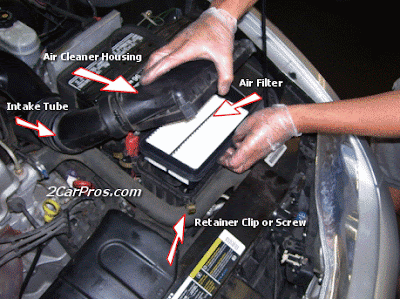
First locate the air box or canister that houses the air filter. Follow the tube or snorkel away from the engine until it ends at the air box.


Release any clips or fasteners that hold the air box together.


Loosening hose clamps can help in separating the air box.


Be careful not to damage the MAF/MAP sensor or wiring. Disconnect if additional slack is needed.


Separate the air box and remove the old air filter. While wrestling with the clips and tubes, be careful not to tear any hoses or damage sensors.


This air filter had done its job well.


Use a shop vacuum to remove any remaining debris from the air box.


Install the new filter, making sure it seats in the air box housing.


Reinstall any clips or fasteners. Reconnect and retighten anything loosened during disassembly. Check to see if the air box parts form a tight seal. 


For more information: automedia

Wednesday, December 1, 2010

DIY car repair - Radiator Fluid (coolant) Inspection

A coolant is a fluid which flows through your car radiator to prevent its overheating. The most common coolant is water. There are several types of coolant you can find in market, each of them provided the same function.

Proton Genuine Coolant

Coolant is better and faster heat absorber compared to water, but it is corrosive to the radiator. In order to minimize the corrosive effect, it is important that you use a combination of water and coolant to protect your car radiator. The mixture ratio is stated in the instruction (normally is 50:50). You are advised to use only distilled water, due to the chlorine and particles present in the tap water which may block your tiny water gallery OR cause rust.
Radiator corrosion causes by coolant

The coolant in your radiator doesn't last forever. It is crucial you perform a coolant checking once every 2 to 3 days, fill it up when need. Coolant level should be between "low"and "full" marks and not to approach to any of them. Apart from that, from time to time it can break down and start to corrode the inside of your radiator. This can lead to cooling problems and radiator repair. A radiator flush once a year is cheap insurance against radiator repairs.

Refill your coolant


Important tips:
  • If u need to frequent fill up your radiator, your car radiator may have leaking problem. You need to carefully investigate coolant hoses regarding leaks, tears or damage.
  • In most cases the liquids are brightly colored - green, red, yellow, blue - and usually thin and transparent. The coolant must be clean and contain no debris. If you see something else in the coolat container, oil for example, this means that you may have an engine defect somewhere.You’ll probably need that will need a professional help. 
  • Brown color of your coolant shows that your car needs a radiator flush.

Tuesday, November 30, 2010

DIY car repair - Regular maintenance

Regular maintenance are important to keep your car out of the repair shop. Regular checking a few of these little things will help to ease the pain in your wallet. It may seem like a waste of time to constantly perform maintenance tasks on your car, but most of the regular maintenance checks only take a minute,so don't be lazy. It helps to save your money too. So, few minutes a day is worth the effort.


If you keep a regular maintenance schedule and checklist you'll always stay on track and avoid costly repairs. Maintenance intervals are a good way to keep on top of things. Below is a sample of Car Regular Maintenance Checklist:
  • Radiator Fluid (coolen) Inspection 
  • Air Filter Inspection 
  • Tire checks
  • Windshield Wipers checks
  • Brakes Inspection
  • Car Battery checks
  • Headlights Inspection (especially on rainy season)
  • Fuel Filters Inspection
  • Timing Belt Inspection
  • Power Steering Fluid Inspection
  • Spark plugs Inspection
  • Oil change

Monday, November 29, 2010

DIY car repair - What tools you need

Car repairing is something many of us say we do, but in reality few of us take the time to properly maintain our vehicles. we tend to let the professional to handle it, whenever there is a problem. Truth be told, there are even some repairs that could be classified as maintenance, just because the repair itself functions to keep a larger disaster from happening.

In this series of articles, we are going to discuss about how to "Do-It-Yourself in car repair". To jump-start our journey into the world of DIY car repair, be sure our tool box has what we need to make the repair easy, pain free, and safe. We can easily get all these important tools from Ace Hardware, hardware shops or any hypermarkets.

Basic tools we need are:
  • screwdrivers (all size)
  • hex keys
  • open end wrenches
  • oil filter wrench
  • ratchet driver in 1/4 and 3/8, maybe 1/2
  • cutting pliers
  • extensions
  • sockets
  • torque wrench
  • PB Blaster or another penetrating oil
  • work light, fluorescent or LED
  • repair manual
  • pliers (sometimes it has to be)
  • channel locks
  • crescent wrench
  • breaker bar or impact gun